 Christmas Mega Sale – Enjoy Up to 50% OFF on Every Plan!
From an SEO efforts or user experience standpoint, page loading speed is as important as growing your business in the competitive market. When it comes to creating a website or establishing a business online, WordPress is the leading platform with easy integration of images, and videos into posts, and pages. Luckily, the new versions of WordPress as CMS come with great features, and most importantly, WordPress lazy loading functionality which lazy loads page resources automatically.
However, all the images and videos must go through lazy loading. This is because, if you have a WordPress website or WooCommerce integrated with heavy images or videos, it can harm your website’s loading speed and performance further down the line.
So, Let’s dive deep into what lazy loading images are and know more about how you can implement it on your WordPress website with and without a plugin.
What is Lazy Loading and How does it work?➲
Lazy loading is an optimization technique to allow loading of the content visible to the user and delay downloading and rendering of the below-the-fold content.
For posts and pages which embed videos and high-resolution images, lazy loading can be a game-changer.
Lazy loading works like this:
- The browser builds the web page DOM without downloading images and preloading videos.
- The images to download and videos to preload based on the initially visible content determined by JavaScript.
- Lazy loading delays the downloading and rendering of the off-screen images and videos until it comes into view by the site visitor after scrolling down the page.
Eventually, images don’t download and videos don’t load in advance until they are actually needed. Thus, a WordPress website experience a boost in speed and performance no matter how heavy the images and embedded videos are.
Read Also: 10 Tips to Reduce Website Bounce Rate & Boost Conversion
Pros and Cons of WordPress Lazy Loading➲
If you are wondering whether implementing lazy loading on your WordPress website will help you or not, take the pros and cons into consideration:
Pros:
- Reduces bandwidth usage, lowering hosting costs.
- Boost site speed, making visitors’ browsing experience better.
- Improve mobile experience.
- Optimizes the Largest Contentful Paint score
- Maximize SEO efforts, increasing your site’s search rankings.
Cons:
- Causes content buffering, hurting the loading speed.
- Slows down quick scrolling.
How to Add WordPress Lazy Loading to Your Website with and without plugin➲
Images and videos contribute 78% of the total page weight and downloading of these resources can take time while loading. Lazy loading helps you optimize images, or videos and makes them load only when users come into the viewport.
As you now know the pros and cons of lazy loading, let’s understand how to implement it on your WordPress website:
1. Implement Lazy loading using WordPress Plugin – W3speedster
You can eliminate lazy loading issues by installing a WordPress plugin. There are many WordPress plugins available in the market. However, installing a speed optimization plugin would benefit you in the long run. For instance, you can use w3speedster if you are looking for a one-stop solution to speed up your WordPress. It will give you more control over which images to lazy load without coding.
Moreover, it will help you achieve a top score on Google PageSpeed Insights.
So, follow the steps below to add lazy loading to your WordPress website using w3speedster:
Step 1: Install and Activate the Plugin
Log in to your WordPress admin panel and go to Plugin > Add New and click on Upload Plugin.
Select the zip file and click on Install Now. After that, you will be asked if you are sure you want to install the plugin. Click yes and the installation process will get started.
Once it’s activated, go to the settings panel and you are ready to enjoy the plugin.
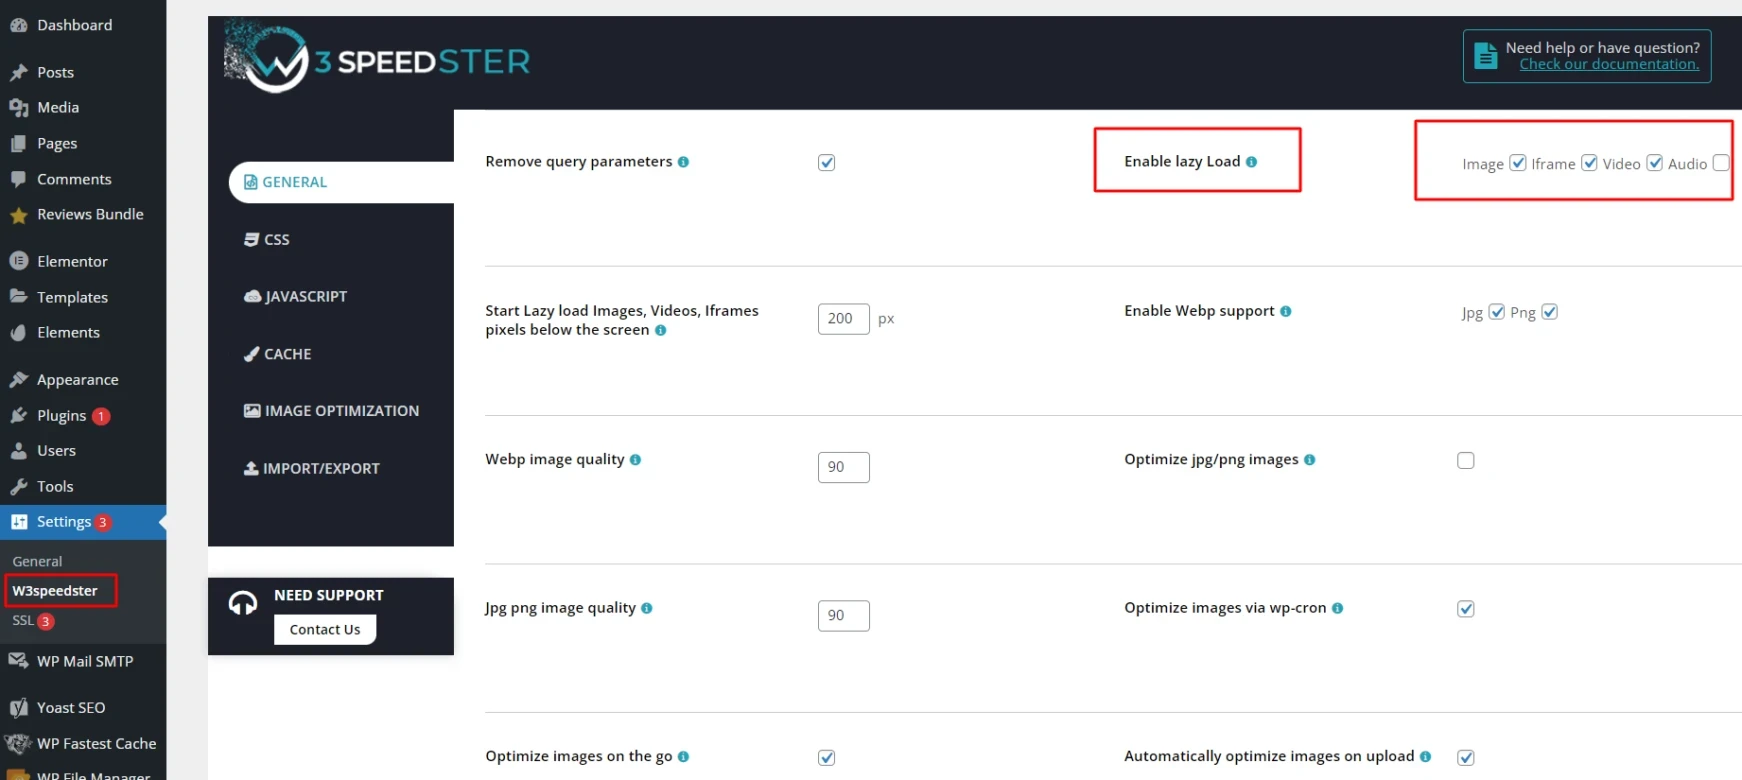
Step 2: Configure the Plugin’s Settings
Next, navigate to the w3speedster plugin to configure settings for lazy loading. Here, you can choose different formats of your site’s pages you want lazy loading to handle.
W3speedster allows you to lazy load images, iframe, video, & audio. Simply check off the boxes for the items you’d like to include and save changes.
2. Adding Lazy Loading Manually (without plugin)
If you want to implement lazy loading manually, there are many popular browsers like Chrome, Firefox, and Opera that support native lazy loading. All you need to do is add <img loading= “lazy”> loading attribute to the targeted images and videos to enable it automatically.
However, lazy loading is now the part of WordPress and you can see it implemented by default with attributes on the images you’ve uploaded to your site.
Here’s an example of how to use it manually:
<img src=”image-name.png” loading=”lazy” alt=”alt attribute” width=”200″ height=”200″>
Although native lazy loading is another way for adding this functionality to your WordPress website, not all browsers support the loading attribute it uses. Moreover, this method is time-consuming to lazy load individual images, especially for websites that use lots of images.
Impact of Lazy Loading on SEO➲
Search engines crawl your website to index pages and other elements including images. Although lazy loading can drastically increase site performance, in certain cases it can also prevent search engines from indexing images. As a result, they won’t appear in the image search results and your organic traffic might get reduced.
Here are things you should check:
1. Make sure Google can still crawl your lazy-loaded images. You can easily check this using the “Fetch as Google” tool under the crawl section in Google Search Console. If you can see your images in the source code then you’re fine.
2. Don’t forget to use alt tags for the images on your website to help search engines determine the content of your images.
Conclusion
Lazy loading in WordPress boosts your user experience by improving the site loading time and helps you prevent a high bounce rate. Besides improving site speed, lazy loading reduces your bandwidth usage and adds up positive impact on your SEO.
No matter whether you manually add lazy loading or use a plugin to do it, you’ll see speed and performance improvements on your WordPress website.
FAQs – WordPress Lazy Loading➲
1. What are some WordPress Lazy Loading Tips?
Here are a few tips while implementing lazy loading on your WordPress site:
- Don’t lazy load images above the fold: Above the Fold images lie at the top of the page and lazy loading them has no such benefit.
- Choose appropriate placeholders: We recommend using a solid, dominant color or a low-quality image as a placeholder for your images.
- Add buffer time for image load: Adding buffer time to loading images makes them ready in advance before entering the visitors’ viewport and eliminates waiting time.
- Set dimensions of image containers: Doing so will help avoid sudden layout shifts, making your web page looks tidy upon loading.
- Implement lazy loading on long pages: Long pages are considered to take more than two scrolls to reach the end and consist of more than five images below the fold.
2. Why Lazy Load Images in WordPress?
Lazy loading your WordPress speeds up the website and makes a better user experience. Since images account major part of the page weight compared to other web elements, they can increase the loading time.
A single-second delay in the page loading can lead to 7% fewer conversions, 11% fewer page views, and a 16% decrease in customer satisfaction.
One way to handle this situation is to add lazy loading which will delay the loading of the off-screen images and only load images that are visible to the users.

Great job.