 Christmas Mega Sale – Enjoy Up to 50% OFF on Every Plan!

Today, connecting with your audience has become very important. Establishing an email list helps you deliver content straight to your subscribers.
Email lists are a great way to keep your readers or users updated. But what if a reader or a potential customer wants to contact you directly? This is where a contact form can be of immense help.
In this article, we’ll help you configure the Contact Form 7 plugin for your WordPress site.
Let’s get into it!
How to Install Contact Form 7?

Contact Form 7 was launched in 2009 and it currently has over 5 million active installations.
Contact Form 7 can be installed directly from the WordPress plugin repository. You can search for “contact form 7” and install it on your WordPress Dashboard.
Once the plugin is installed, you’ll see a menu item labeled “Contact” in the sidebar of your WordPress dashboard. You can configure all the Contact Form 7’s settings from here.
Contact Form 7 Settings – An Overview
You can easily create a contact form with the Contact Form 7 plugin. Simply click Contact > Contact Forms in your WordPress sidebar. On the page that follows, you can see all of your contact forms along with their associated metadata details.
When you install Contact Form 7 for the first time, it creates a sample form as well. Let’s take a look at the sample form to better understand how Contact Form 7 works. Click on Contact Form 1 to view the form settings.
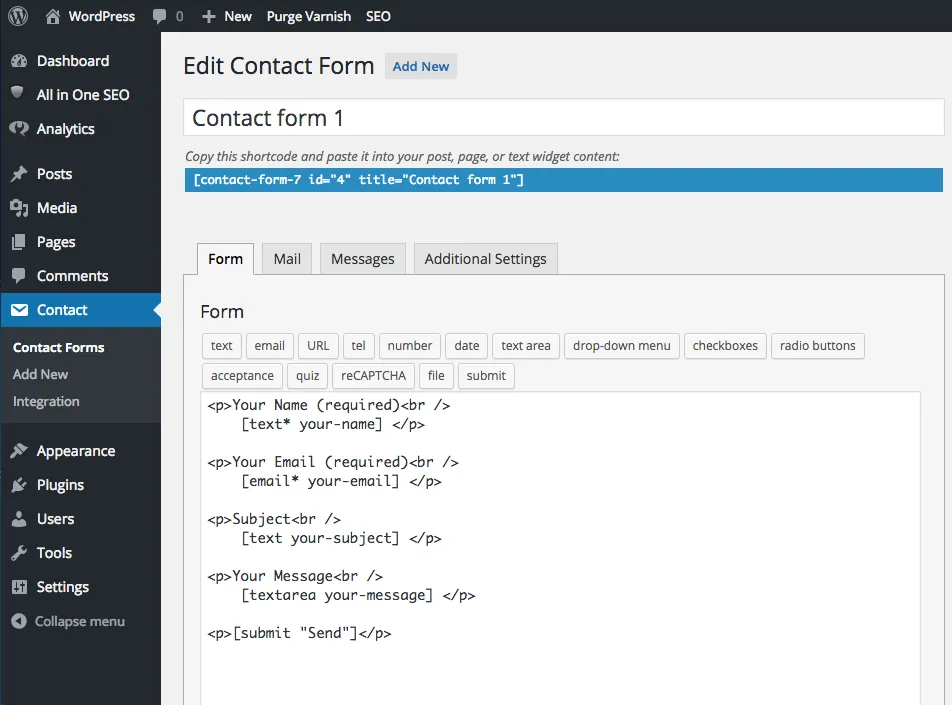
The “Edit Contact Form” page is split into four sections.
-
- Form: You can customize your HTML contact form template using field options like “text”, “email”, “checkboxes”, and more. You can also enter custom HTML in the form customization box.
-
- Mail: Customize the email template and settings used for notification emails.
-
- Messages: Customize messages that are displayed after specific actions. For example, you can display a unique message after someone submits a contact form.
- Additional Settings: Specify snippets to enable additional features like subscribers-only mode, demo mode, and mail skipping.
How to Create a Contact Form in WordPress?
To create a new contact form, go to “Contact” in the left menu on your WordPress dashboard and click on Add New next to “Contact Forms”. Name the new contact form, and click “Save”.
In the “Form” section, add the HTML required for your contact form. Use the preset buttons to generate shortcodes for popular form tags. To make things easier, you can read the descriptions given below for the preset form tags that come with Contact Form 7.
-
- Text: Creates a form tag for a single line of text. Text fields are useful for first names, last names, and other text-based categories that don’t need multiple lines.
-
- Email: Creates a form tag for an email address.
-
- URL: Creates a form tag for a URL.
-
- Tel: Creates a form tag for a telephone number.
-
- Number: Creates a form tag for a number. The “number” fields only allow numeric digits.
-
- Date: Creates a form tag for a date.
-
- Text Area: Creates a form tag for a text area. Unlike the normal “text” input field, a “text area” field allows for multiple lines of text.
-
- Drop-down Menu: Creates a form tag for a drop-down menu.
-
- Checkboxes: Creates a form tag for checkboxes.
-
- Radio Buttons: Creates a form tag for radio buttons.
-
- Acceptance Creates a form tag for an acceptance checkbox.
-
- Quiz: Creates a form tag for a question-answer pair.
-
- File: Creates a form tag for a file upload field.
- Submit: Creates a form tag for a submit button.
You can use the aforementioned preset form tags to make a custom contact form as per your needs. It’s quite easy and you can watch this video to learn exactly how to set up your own contact form.
Structuring a Contact Form with Form tags
Now that we understand all the form tags, let’s create the contact form. Place all the form tags you want to use in all the relevant sections. With the form tags in place, you can use the
Error: Contact form not found.
shortcode to embed the form into a WordPress post or page.Paste the shortcode into an empty block in the WordPress editor.
Are you using the WordPress Classic Editor? If yes, then you can paste the shortcode anywhere in the content editor.
Now, you should see the contact form on the page where you added the Contact Form 7 shortcode. Contact Form 7 automatically converts the form tags into valid HTML that renders with the default CSS styles included with your WordPress theme.
Form tags like “text”, “email”, and “URL” support placeholders. On the other hand, other elements like “checkboxes” and “radio buttons” do not support placeholder.
The checkbox and radio buttons won’t be very useful for visitors without proper labels because they won’t have any context.
Adding Form tag labels in Contact Form 7
There are two ways to add labels to Contact Form 7 form tags. For the form tags below, you can simply wrap the form tag with a placeholder tag.
-
- Text:
-
- Email:
-
- URL:
-
- Tel:
-
- Number:
-
- Date:
-
- Text Area:
-
- Drop-down Menu:
-
- Checkboxes:
-
- Radio Buttons:
-
- Acceptance
-
- Quiz:
- File:
Check out the example “text” form tag below.
[text* text-711 id:cf7-your-name class:cf7-your-name placeholder “Your Name”]
To add a label to this form tag, we can replace the form tag with the snippet below. You’’ see the additional instance of “Your Name” right after the opening <label> </code>tag.</label>
<label> Your Name
[text* text-711 id:cf7-your-name class:cf7-your-name placeholder “Your Name”]</label>
Form tags that render multiple form controls like checkboxes, radio buttons, and dropdown menus, cannot be wrapped inside a </label> tag because it results in an error. For checkboxes, radio buttons, and dropdown menus, you have to add a use_label_element parameter within the shortcode. Follow the example below:
[checkbox* checkbox-948 id:cf7-checkbox class:cf7-checkbox use_label_element “Option 1” “Option 2” “Option 3”]
Configure Mail Settings in Contact Form 7
Now, let’s take a look at the email delivery settings in Contact Form 7. It is most likely that the default mail delivery settings will work just fine for most sites. But, it’s still important to understand the various settings in case if you require a special configuration.
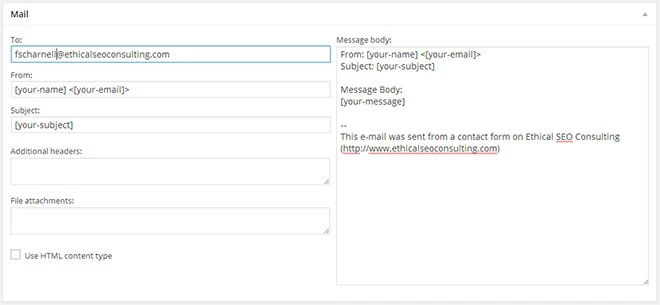
Go to the contact form editor and select the “Mail” tab to access the mail delivery settings.
With Contact Form 7’s mail delivery settings, you can customize the templates and parameters that are used to generate and send a notification to you after someone makes a form submission. It’s possible that you won’t be notified of form submissions if you use incorrect settings. So, it’s important to test the form delivery after creating a contact form and changing settings.
You can configure the following mail delivery settings with Contact Form 7:
-
- To: This is the email address where notifications will be sent.
-
- From: This the email address to send a notification from.
-
- Subject: The subject of the notification email.
-
- Additional Headers: Specify additional email headers like “reply-to”.
-
- Message Body: This is the body of the notification email.
- File Attachments: You can specify any attachments to include with the notification email.
Contact Form 7 Submission Messages
With Contact Form 7, you can customize a variety of form submission messages. These messages are displayed when a certain condition is met. So, if a visitor forgets to fill in a required field, Contact Form 7 will display a “The field is required” message.
The default messages should work just fine for most use cases. However, you can also customize the messages by clicking on the “Messages” tab in the contact form editor.
Use reCAPTCHA to secure your Contact Form
reCAPTCHA is a technology developed by Google for identifying automated bot behavior. Older versions of reCAPTCHA (V2) required users to pass a puzzle or challenge.
The latest version of reCAPTCHA (V3) does not require any interaction from users. It transparently monitors user activity in the background to distinguish between human and bot visitors. Contact Form 7 supports reCAPTCHA V3 and so, we recommend using the latest version because it provides a better user experience for visitors.
To set up reCAPTCHA, you’ll need to generate an API key first. To generate an API key, log in to your Google account and go to the reCAPTCHA setup page.
Go through the registration form to create your reCAPTCHA:
-
- Label: Specify a label of your choosing.
-
- reCAPTCHA Type: Contact Form 7 supports reCAPTCHA v3, so select that version.
-
- Domains: If your site uses a root domain, add the non-www and www version of your domain. If your site uses a subdomain, just add the subdomain.
- Owners: The email address associated with your Google account will be added as an owner by default. Feel free to add additional email addresses if required.
Click “Submit” after you’ve filled in all the options. You’ll then be given your site-specific “site key” and “secret key”. Leep these keys somewhere safe because you’ll need to add them to Contact Form 7.
Now, click on “Contact” in your WordPress dashboard sidebar, and click “Integration”. Select the reCAPTCHA option, and paste your site key and secret key into the specified fields. Lastly, click “Save Changes” to finalize the reCAPTCHA integration.
Once you’ve configured reCAPTCHA in Contact Form 7, you’ll see a reCAPTCHA logo in the lower right corner of your contact form page. This implies that reCAPTCHA is active and protecting your contact form from spam submissions.
Final Words
Contact Form 7 is the most popular contact form plugin on WordPress. It can be used to create all kinds of form. You can create everything from basic contact forms, to question-answer quizzes, to complex forms supporting file attachments and dropdown menus.
Best of all, it has built-in reCAPTCHA support to help secure your contact form against spammers.
Got any questions? Let us know in the comments below and we’ll get back to you. Or, you can also write to us for more comprehensive queries or questions!

Pretty! This has been a really wonderful article. Many thanks for supplying this information.
All your recommendations are going to be on my to try list. Thanks for the wonderful post.
I was able to find good info from your blog articles.
Thank you for the auspicious writeup.
Normally I do not learn post on blogs, however I wish to say that this write-up very forced me to check out and do it! Your writing taste has been amazed me. Thanks, quite nice article.
This is a great article, Thanks so much for sharing!
Thank you so much for the great article, it was fluent and to the point. Cheers.